iOS App Development
Stepper component design using UIBezierPath with Swift
May 17, 2023
User experience and ergonomics are now almost the most important metrics in today’s web and mobile applications. In this direction, stepper is one of the leading screen design trends, especially in progressive transactions such as payment, registration process or identity verification. Stepper is an indispensable design component, which provides information about which step the user is on and how the road map will be in front of them, and when it is presented with a design that is pleasing to the eye, it greatly enhances the user experience.


In this article, I am going to explain how we can create the design of a multifunctional stepper component in the iOS ecosystem with the Swift language and how we can easily implement it in the design of application screens. Let’s get started, pleasant reading 🙂
Stepper Properties
While starting the working logic of the component, let’s first look at the variables and objects we use in the component. Since there are different usage scenarios, there is an enum structure where we choose the stepper type. This enum consists of two cases, .Numeric and .Icon. We can create a numeric stepper or a stepper consisting of icons. We will be setting this when we implement it on the screens. If the stepper will be implemented with the .Icon selection, it is fed by a dictionary called stepperIcons. This dictionary contains the names of the icons used in the steps of the stepper. These names can be the names of the icons in the Assets folder or the names of the system icons.
import UIKit

@IBDesignable
final class StepperView: UIView {

    enum StepperType {
        case Numeric
        case Icon
    }
    /// The stepper type selection
    var stepperType: StepperType = .Numeric
    var stepperIcons = [Int:String]()
numberOfPoints, currentIndex and completedTillIndex are the variables that hold information about how many steps the stepper will have, the current step and the completed steps up to the current step. We will use these variables when drawing the steps.
The lineHeight and radius variables are the most important variables that allow us to draw. The lineHeight variable holds the thickness of the line between two steps and the radius variable holds the radius of each circular step. Both of these variables have computed properties called _lineHeight and _radius, and the actual calculation of the variables takes place in these computed properties.
/// The number of displayed points in the component
    @IBInspectable var numberOfPoints: Int = 3 {
        didSet {
            setNeedsDisplay()
        }
    }

    /// The current selected index
    @IBInspectable var currentIndex: Int = 1 {
        didSet {
            setNeedsDisplay()
        }
    }

    @objc var completedTillIndex: Int = -1 {
        didSet {
            setNeedsDisplay()
        }
    }

    @objc private var currentSelectedCenterColor = UIColor(red: 101.0/255.0, green: 66.0/255.0, blue: 190.0/255.0, alpha: 1.0)
    @objc private var centerLayerTextColor = UIColor(red: 156.0/255.0, green: 145.0/255.0, blue: 158.0/255.0, alpha: 1.0)


    private var lineHeight: CGFloat = 1.0 {
        didSet {
            setNeedsDisplay()
        }
    }

    @objc private var textDistance: CGFloat = 20.0 {
        didSet {
            setNeedsDisplay()
        }
    }

    private var _lineHeight: CGFloat {
        get {
            if lineHeight == .zero || lineHeight > bounds.height {
                return bounds.height * 0.4
            }
            return lineHeight
        }
    }

    /// The point's radius
    private var radius: CGFloat = 40.0 {
        didSet {
            setNeedsDisplay()
        }
    }

    private var _radius: CGFloat {
        get {
            if radius == .zero || radius > bounds.height / 2.0 {
                return bounds.height / 2.0
            }
            return radius
        }
    }
CALayer, CAShapeLayer and CATextLayer
While drawing the stepper, I used CALayer and CATextLayer structures using Core Animation. In fact, the designs seen by the user on the screen consist of layers. With the different objects we place on these layers, we reveal the entire design.
We keep the layers required for the component we will design in a private variable. Then, when our component is init with a commonInit function, we add these layers to the main layer as sublayers. I created a few different layers here as an example. I don’t use all of these layers in the component.
// MARK: - Private properties

    private var backgroundLayer = CALayer()

    private var progressLayer = CAShapeLayer()

    private var selectionLayer = CAShapeLayer()

    private var clearSelectionLayer = CAShapeLayer()

    private var clearLastStateLayer = CAShapeLayer()

    private var lastStateLayer = CAShapeLayer()

    private var lastStateCenterLayer = CAShapeLayer()

    private var selectionCenterLayer = CAShapeLayer()

    private var roadToSelectionLayer = CAShapeLayer()

    private var clearCentersLayer = CAShapeLayer()

    private var maskLayer = CAShapeLayer()

    private var centerPoints = [CGPoint]()

    private var _textLayers = [Int: CATextLayer]()

    private var _customImageLayers = [Int: CALayer]()

    private var _imageLayers = [Int: CALayer]()

    private var previousIndex: Int = 0

    // MARK: - Life cycle
    override init(frame: CGRect = .zero) {
        super.init(frame: frame)
        commonInit()
    }

    required init?(coder aDecoder: NSCoder) {
        super.init(coder: aDecoder)
        commonInit()
    }

    func commonInit() {
        layer.addSublayer(clearCentersLayer)
        layer.addSublayer(backgroundLayer)
        layer.addSublayer(progressLayer)
        layer.addSublayer(clearSelectionLayer)
        layer.addSublayer(selectionCenterLayer)
        layer.addSublayer(selectionLayer)
        layer.addSublayer(roadToSelectionLayer)
        progressLayer.mask = maskLayer

        contentMode = UIView.ContentMode.redraw
    }
draw() function
override func draw(_ rect: CGRect) {
        super.draw(rect)

        completedTillIndex = currentIndex

        centerPoints.removeAll()

        let distanceBetweenCircles = (bounds.width - (CGFloat(numberOfPoints) * 2 * _radius)) / CGFloat(numberOfPoints - 1)

        var xCursor: CGFloat = _radius


        for _ in 0...(numberOfPoints - 1) {
            centerPoints.append(CGPoint(x: xCursor, y: bounds.height / 2))
            xCursor += 2 * _radius + distanceBetweenCircles
        }

        let bgPath = _shapePath(centerPoints, aRadius: _radius, aLineHeight: _lineHeight)
        backgroundLayer = bgPath

        switch stepperType {
        case .Numeric:
            renderTextIndexes()
        case .Icon:
            renderCustomImageIndexes()
        }
        renderImageIndexes()
    }
We can actually think of this as the setup function where we collect everything and put it together to draw it on the screen. We fill the StepperView with the draw function we override from UIView.
We determine the current state of the stepper by mapping completedTillIndex to currentIndex.
The centerPoints[] array is a CGPoints array that holds the exact position of the steps.
To calculate the distance between each point, we subtract the total diameter of the steps from the total width of the stepper and divide by the number of steps. In this way, we can calculate the equal distance between each stepper.
Then, in a for loop, we calculate the exact position where each step will be drawn using the radius and the variable that holds the distance between the steps and append it to the centerPoints array. You can think of xCursor as the cursor pointing to the point here. At the end of each loop, we update the position of xCursor to iterate.
Then we assign the layer that we drew in the _shapeLayer function to the backgroundLayer we created. We add the backgroundLayer as a sublayer in commonInit.
The drawing of the layers and the calculation of the points is complete. All that remains is to determine the content of each step. By doing this in the renderTextIndexes(), renderImageIndexes() and renderCustomImageIndexes() functions that we call according to the stepperType, the lifecycle of the component is completed.
renderTextIndexes(), renderImageIndexes(), renderCustomImageIndexes() functions
Apart from layer drawings, another main topic is the creation of step indexes in the layer. In this example, I created the component over three layers. If the stepper will be used as .numeric, the renderTextIndexes() and renderImageIndexes() functions are enough for stepper drawing. If the stepper is in .icon format, we use the renderImageIndexes() and renderCustomIndexes() functions.
private func renderTextIndexes() {
        if (stepperType == .Numeric) {
            for index in 0...(numberOfPoints - 1) {
                let centerPoint = centerPoints[index]

                let textLayer = _textLayer(atIndex: index)

                textLayer.contentsScale = UIScreen.main.scale
                textLayer.font = centerLayerTextFont
                textLayer.fontSize = (centerLayerTextFont?.pointSize)!

                if index == currentIndex || index == completedTillIndex {
                    textLayer.foregroundColor = UIColor.white.cgColor
                } else {
                    textLayer.foregroundColor = centerLayerTextColor.cgColor
                }

                if index < currentIndex {
                    textLayer.string = ""
                } else {
                    textLayer.string = "\(index + 1)"
                }

                textLayer.frame = .init(origin: CGPoint(x: 0.0, y: 0.0), size: textLayer.preferredFrameSize())
                textLayer.frame = CGRect(x: centerPoint.x - textLayer.bounds.width / 2,
                                         y: centerPoint.y - (textLayer.fontSize) / 2 - (textLayer.bounds.height - textLayer.fontSize) / 2,
                                         width: textLayer.bounds.width,
                                         height: textLayer.bounds.height)

            }
        }
    }
    private func renderImageIndexes() {
        for index in 0...(numberOfPoints - 1) {
            let centerPoint = centerPoints[index]

            let imageLayer = _imageLayer(atIndex: index)

            imageLayer.contentsScale = UIScreen.main.scale

            if (index < currentIndex) {
                imageLayer.isHidden = false
            } else {
                imageLayer.isHidden = true
            }

            imageLayer.frame.size = CGSize(width: 21, height: 21)

            imageLayer.frame = CGRect(x: centerPoint.x - imageLayer.bounds.width / 2,
                                      y: centerPoint.y - imageLayer.bounds.height / 2,
                                      width: imageLayer.bounds.width,
                                      height: imageLayer.bounds.height)
        }
    }
private func renderCustomImageIndexes() {
        for index in 0...(numberOfPoints - 1) {
            let centerPoint = centerPoints[index]

            let customImageLayer = _customImageLayer(atIndex: index)

            customImageLayer.contentsScale = UIScreen.main.scale

            if !(index < currentIndex) {
                customImageLayer.isHidden = false
            } else {
                customImageLayer.isHidden = true
            }

            if (index == numberOfPoints - 1) {
                customImageLayer.frame.size = CGSize(width: 18, height: 20.24)
            } else {
                customImageLayer.frame.size = CGSize(width: 21, height: 21)
            }

            customImageLayer.frame = CGRect(x: centerPoint.x - customImageLayer.bounds.width / 2,
                                            y: centerPoint.y - customImageLayer.bounds.height / 2,
                                            width: customImageLayer.bounds.width,
                                            height: customImageLayer.bounds.height)
        }
    }
Each of these functions determines the content of a layer. The center points for drawing are taken from the centerPoints array. There are _textLayer, _imageLayer and _customImageLayer functions used in each function, which create the layers. The layers created using these functions are shown or hidden according to the currentIndex.
The _textLayer() function creates the layer with the numbers in the .numeric stepper. The _imageLayer() function creates the layer with the done icon in the completed steps. Finally, the _customImageLayer() function creates the layer with the icons in each step if the stepper is in the .Icon view. If the index in the for loop is greater than or equal to the currentIndex, the imageLayer is hidden and vice versa.
At the end of the each render functions, the frame of the layer is rendered according to the coordinates in the centerPoints.
private func _textLayer(atIndex index: Int) -> CATextLayer {

        var textLayer: CATextLayer
        if let _textLayer = _textLayers[index] {
            textLayer = _textLayer
        } else {
            textLayer = CATextLayer()
            _textLayers[index] = textLayer
        }
        layer.addSublayer(textLayer)
        return textLayer
    }
    private func _imageLayer(atIndex index: Int) -> CALayer {

        var imageLayer: CALayer
        if let _imageLayer = _imageLayers[index] {
            imageLayer = _imageLayer
        } else {
            imageLayer = CALayer()
            //            imageLayer.contents = UIImage(systemName: "star.fill")?.cgImage
            imageLayer.contents = UIImage(named: "doneStep")?.cgImage
            _imageLayers[index] = imageLayer
        }
        layer.addSublayer(imageLayer)

        return imageLayer
    }
private func _customImageLayer(atIndex index: Int) -> CALayer {
        var customImagelayer: CALayer
        let uncheckedIconColor = UIColor(red: 156.0/255.0, green: 145.0/255.0, blue: 158.0/255.0, alpha: 1.0)
        let checkedIconColor = UIColor.orange
            if let _customImageLayer = _customImageLayers[index] {
                customImagelayer = _customImageLayer
            } else {
                customImagelayer = CALayer()
                var stepIcon = UIImage(named: stepperIcons[index] ?? "")
                if index <= currentIndex {
                    customImagelayer.contents = stepIcon?.withColor(checkedIconColor)
                } else {
                    customImagelayer.contents = stepIcon?.withColor(uncheckedIconColor)
                }
                _customImageLayers[index] = customImagelayer
            }
        layer.addSublayer(customImagelayer)

        return customImagelayer
    }
_shapePath() function
We mentioned that the _draw() function is where we put all the pieces together. The most important of these parts is the _shapePath() function. In this function, we are drawing all the calculations we made using UIBezierPath().
private func _shapePath(_ centerPoints: [CGPoint], aRadius: CGFloat, aLineHeight: CGFloat) -> CALayer {

        let nbPoint = centerPoints.count

        for i in 0..<nbPoint{
            let centerPoint = centerPoints[i]
            let shape: UIBezierPath
            let fillLayer = CAShapeLayer()
            shape = UIBezierPath(roundedRect: CGRect(x: centerPoint.x - aRadius, y: centerPoint.y - aRadius, width: 2.0 * aRadius, height: 2.0 * aRadius), cornerRadius: aRadius)

            /// Background color set of step points.
            switch stepperType {
            case .Icon:
                if i <= currentIndex {
                    fillLayer.path = shape.cgPath
                    fillLayer.fillColor = UIColor(red: 214.0/255.0, green: 204.0/255.0, blue: 178.0/255.0, alpha: 0.8).cgColor

                }else{
                    fillLayer.path = shape.cgPath
                    fillLayer.fillColor = UIColor(red: 231.0/255.0, green: 229.0/255.0, blue: 232.0/255.0, alpha: 1.0).cgColor
                }
            case .Numeric:
                if i <= currentIndex{
                    if i != currentIndex {
                        fillLayer.path = shape.cgPath
                        fillLayer.fillColor = backgroundShapeColor.cgColor
                    } else {
                        fillLayer.path = shape.cgPath
                        fillLayer.fillColor = UIColor.orange.cgColor
                    }
                }else{
                    fillLayer.path = shape.cgPath
                    fillLayer.fillColor = backgroundShapeColor.cgColor
                }
            }
            layer.addSublayer(fillLayer)

            let shapeLayer = CAShapeLayer()
            if nbPoint > 1 && i != nbPoint - 1{
                //design the path
                let path = UIBezierPath()
                let nextPoint = centerPoints[i + 1]
                path.move(to: CGPoint(x: centerPoint.x + aRadius + 10, y: centerPoint.y))
                path.addLine(to: CGPoint(x: nextPoint.x - aRadius - 10, y: nextPoint.y))

                //design path in layer
                shapeLayer.path = path.cgPath
                shapeLayer.strokeColor = backgroundShapeColor.cgColor
                shapeLayer.lineWidth = aLineHeight
            }
            layer.addSublayer(shapeLayer)
        }
        return layer
    }
The function takes as parameters the centerPoints array containing the points to be drawn, the lineHeight variable containing the height of the line to be drawn between two steps and the radius variable containing the step radius. In a for loop, a drawing is made with UIBezierPath for each step. Then the inside of the drawing is colored according to the stepper type.
In the last part, the drawing is completed by drawing the line between the two steps in the shapeLayer. Then the layer containing all of them is returned to be used in the draw() function.
Implementation in screen designs
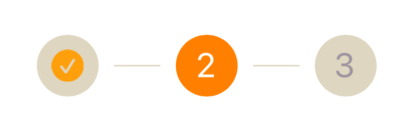
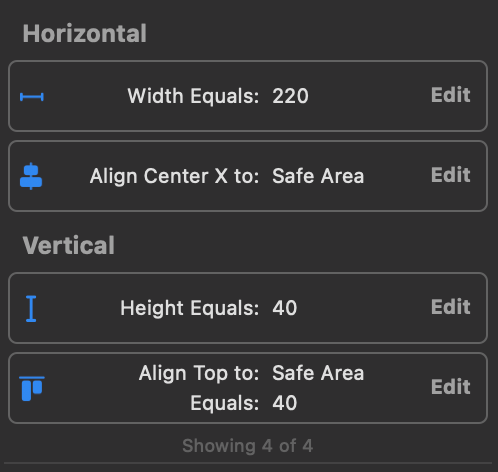
After creating your interface with storyboard or programmatic, create a UIView. This view should be an object from the StepperView class. You should update the width constraint according to the number of steps you want to apply. For a stepper with 3 steps, the ideal width can be taken as 220 points.

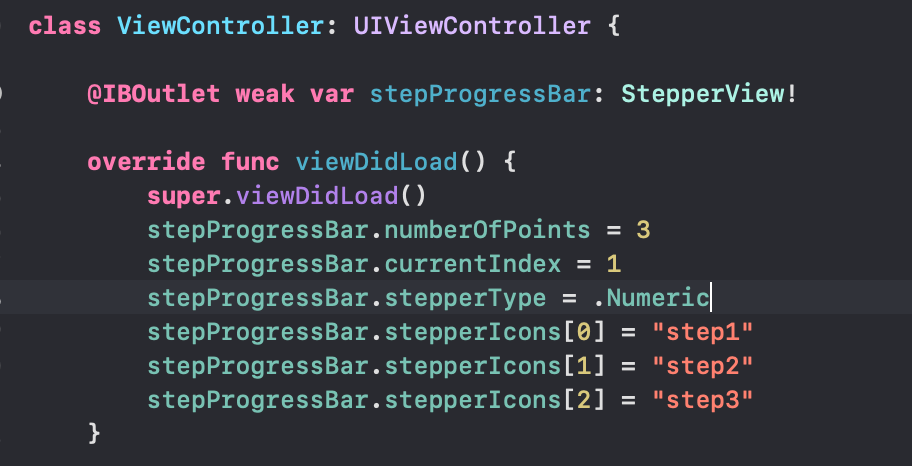
After defining the stepper in ViewController, you can give numberOfPoints and currentIndex values as you want. You can select the stepper type. If you want to use the stepper in .icon view, you can give the icon names as a string to the stepperIcons dictionary.
Overview
You can customize the stepper according to your wishes. The key points for this will be the renderTextImages, renderImageIndexes and renderCustomImageIndexes functions. The icons on the stepper can be updated on these functions.
Again, since the _shapePath function is where the drawings are made, you can focus on this function for color changes and updates.
In this article, I tried to explain how we can build a stepper component with Swift using UIBezierPath and Core Animation layers. I hope it was a useful and understandable article. You can access the demo project from my GitHub account below. See you in the next article! 👋🏻
Author: Oğuzhan Kertmen