
Photo: Final match of the 1575 tournament in El Escorial. Painting by Luigi Mussini.
Nedir bu Gens Una Sumus? — FIDE’nin (Fédération Internationale des Échecs) -Dünya Satranç Federasyonu- satranç için kullandığı, basit görünen ama altında derin anlamlar taşıyan bir mottosudur. Türkçe tercümesi ise ‘’Biz bir aileyiz’’
Çünkü satranç ortak paydasında buluşanlar bilirler ki dil,din,ırk fark etmeksizin hepimizin konuştuğu sessiz bir dil, ortak bir paylaşım enstrümanıdır satranç.
22 sene önce orta okulda matematik öğretmenimin önerisi ile tanıştığım satranç, normal hayatımda olduğu kadar iş hayatımda da birçok durumda eşsiz bir usta, bir danışman, bir yaşam koçu, bir guru olarak desteğini üzerimde hissettiriyor.
O zamanlar satranç tahtasındaki siyah ve beyaz karelerin büyüsüne kapılan küçük ben aslında zamanla dualitenin hayatımızdaki yerini ve önemini öğrenmeye başlamıştım. Ama şimdilik bunu başka bir yazının konusu yapalım ve gelin bu benzersiz oyununun kurumsal hayatımıza nasıl eşlik edebileceğini konuşalım.
Bildiğiniz üzere iş dünyası, sürekli değişen dinamikleri, rekabeti ve karmaşıklığı ile bilinir. Her geçen gün ise bu durum daha karmaşık ve rekabetçi bir hal almaktadır. Bu zorlu ortamda, iş hayatindaki profesyoneller herhangi bir avantajı kullanmak için önlerine çıkan tüm fırsatları değerlendirerek ellerinden geleni yapmaya çalışırlar. Ancak, bu avantajlar çoğunlukla beklenmedik yerlerde ve zamanlarda gelir. İşte tam da bu noktada, satranç oyununun iş hayatında bizlere sağladığı derin ve kapsamlı avantajları inceleyelim istiyorum.
Çünkü Satranç, sadece eğlenceli bir masa oyunu değil, aynı zamanda iş dünyasına farklı perspektifler sunan bir liderlik ve bilgelik okuludur.
Peki bu okulun müfredatında neler var?
1. Takım Ruhu
Satranç oyununda her taşın kendine ait bir görevi ve önemi vardır. Ancak tüm taşlar, tekil varlıklar olsalar da aslında bir bütünü oluştururlar. Bir vezir, Şah’ın hayatta kalması için diğer taşlara göre üstün gözükebilir ancak yeri gelir bir piyonun pozisyonu veya hamlesi ile oyun kazanılabilir. İş hayatında da daha çok bireysellikten öte takım ruhu ile hareket edenler kazanmaktadır. Birlik ve beraberlik duygusu projelerimizde bizi başarılı kılan en temel unsurdur.
2. Hatalardan Ders Çıkarma
Satranç, retrospektif deneyimlerimizden yola çıkarak bir sonraki oyunda aynı hataları yapmamızı engelleyen bir öğretmendir. İş hayatında da, zaman zaman yaptığımız hatalardan dersler alarak bu hataların tekrarlanmamasına yönelik gerekli tüm aksiyonları almak önemlidir. Satranç bu noktada oldukça usta bir öğreticidir.
3. Strateji ve Planlama Yetenekleri
Satranç, oyunculara karmaşık stratejiler oluşturma ve uzun vadeli planlama yetenekleri kazandırmakta yardımcı olur. Her hamle düşünülerek atılır, her seçenek özenle değerlendirilir. İş dünyasında da aynı titizlikle strateji oluşturmak ve uzun vadeli hedeflere ulaşmak kritik bir rol oynar. Satranç, bu becerileri geliştirmemize büyük katkıda bulunur.
4. Risk Yönetimi ve Özgüven
Satranç, oyuncuların riskleri öngörmelerini ve yönetmelerini gerektirir. Her hamle bir risk taşır ve bu riskleri dikkatle değerlendirmek, özgüven gerektirir. Bazen bir oyunda isteyerek kaybedilen önemli bir taş aslında oyunu kazanmamıza sebep olurken karşımızdaki oyuncuda hayranlık uyandıran bir hamle olarak yer eder. İş dünyasında da riskleri yönetmek ve kararlarımızın arkasında durmak önemlidir. Satranç, bu tip sanatsal hamlelerle özgüvenimizi artırarak bu alanda daha başarılı olmamıza yardımcı olur.
5. Karar Verme Yeteneği
Satranç, oyunculara hızlı ve mantıklı kararlar almanın önemini gösteren bir bilge gibidir. Her hamle, oyunun sonucunu etkileyebilir ve bu nedenle kararlar dikkatle düşünülerek alınmalıdır. İş dünyasında da hızlı kararlar almak, rekabet avantajı sağlama açısından oldukça önem taşır. Satranç, bu yeteneğimizi geliştirmemize yardımcı olur.
6. Problem Çözme ve Analitik Düşünme
Satranç, oyuncuların karmaşık sorunları çözme ve analitik düşünme yeteneklerini geliştirmelerine yardımcı olur. Rakip stratejilerini çözmek, hamleler arasındaki neden-sonuç ilişkilerini anlamak ve en iyi çözümleri bulmak için analitik zeka gerekir. Günümüz iş dünyasında da aynı beceriler, karmaşık sorunları çözmek ve verilere dayalı kararlar almak için hayati önem taşır. Satranç, bu açıdan mükemmel bir okuldur.
7. Konsantrasyon ve Sabır
Satranç, derin bir konsantrasyon ve sabır gerektirir. Bir oyun saatlerce sürebilir ve her hamle düşünülerek atılmalıdır. Aynı zamanda, beklenmedik durumların üstesinden gelmek ve sonucu beklemek, sabır ve disiplin gerektirir. İş dünyasında da konsantrasyonu sürdürmek ve uzun vadeli projeler üzerinde çalışmak sabır ve disiplin gerektirir. Satranç, bu anlamda gelişmemize katkı sağlayan bir sanat eseridir.
8. Liderlik ve İşbirliği Yetenekleri
Satranç, takım oyunları veya turnuvalar sırasında işbirliği ve liderlik becerilerimizi geliştirmemize olanak tanır. Oyuncular, stratejilerini diğerleriyle paylaşarak veya bir ekip olarak hareket ederek kazanma hedefini paylaşırlar. İş dünyasında da başarılı olmak için liderlik ve işbirliği yetenekleri kritik öneme sahiptir.
9. Kişisel Gelişim ve Zihinsel Sağlık
Satranç oynamak kişisel gelişimi teşvik eder ve zihinsel sağlığı iyileştirir. Bu oyun, zihinsel keskinliği artırır, öğrenmeye olan açıklığı artırır ve problem çözme yeteneklerini geliştirir. İş dünyasında bu tür bir kişisel gelişim, kariyerlerimizde ilerlerken önemli bir rol oynar.
10. Zaman Yönetimi
Satranç, sınırlı zaman içinde hızlı kararlar almayı gerektirir. İş dünyasında da hızlı kararlar almak ve zamanı etkili bir şekilde yönetmek önemlidir. Satranç, bu konuda en geliştirici öğretmenlerden bir tanesi olarak sahne almaktadır.

11. Uzun Vadeli Hedef Belirleme
Satranç, oyunculara uzun vadeli hedefler belirleme ve bu hedeflere nasıl ulaşacaklarını planlama becerisi kazandırır. İş dünyasında, uzun vadeli planlama ve hedef belirleme, başarıya giden yolu aydınlatan en önemli kaynaklardan biridir.
12. Empati ve Rakip Analizi
Satranç, oyuncuların rakip düşünce süreçlerini analiz etmeyi ve empati yapmayı öğretir. İş dünyasında da empati ve rakip analizi, rekabet avantajı sağlayarak bir adım önde olmamızı sağlar.
13. İnovasyon ve Yaratıcılık
Satranç, oyunculara yeni ve yaratıcı stratejiler geliştirme fırsatı sunar. Her bir oyun yeni bir ders kitabı gibidir. İş dünyasında da inovasyon ve yaratıcılık, rekabetçi bir avantaj sağlayarak rakiplerimizin önüne geçmemizi sağlar.
14. Değişime Uyum ve Esneklik
Satranç, beklenmedik durumlarla başa çıkmayı öğretir ve oyuncuları hızla değişen koşullara adapte olmaya teşvik eder. İş dünyasında değişime uyum ve esneklik bu zorlu hayatta kalabilmek için büyük önem taşır.
15. Disiplin ve Sistemli Düşünme
Satranç, oyunculara disiplinli ve sistemli düşünme alışkanlığı kazandırır. Her hamle düşünülerek atılmalı, kurallara uygun hareket edilmelidir. İş dünyasında da bu tür disiplin ve düzenli çalışma alışkanlıkları oldukça değerlidir.
16. Dikkat ve Odaklanma Yetenekleri
Satranç, dikkat ve odaklanma becerilerini artırır. Oyuncular, her hamleyi incelemek ve rakibin stratejilerini izlemek için yüksek konsantrasyona sahip olmalıdır. İş hayatında da işimizi iyi ve başarılı yapmak için dikkatli olmak bize avantaj sağlar.
17. Mücadeleci Ruh ve Azim
Satranç, oyunculara mücadeleci bir ruh ve azim duygusunu kazandırır. Satranç oyuncuları her zorluğa karşı direnmeyi öğrenirler. Bu kişisel özellikler de bizi iş hayatında öne geçiren önemli unsurlardandır.

Dönüp baktığınızda aslında satrancın bir oyundan daha fazlası olduğunu fark ettiniz değil mi?
Satranç, iş hayatında stratejik bir üstünlüğü temsil eder ve bu avantajı değerlendirenler için sınırsız fırsatlar sunar. Bu oyun, profesyonellerin iş dünyasında liderlik rollerini üstlenmeleri, problem çözmeleri, stratejik düşünmeleri, karar verme, problem çözme, konsantrasyon, sabır, işbirliği, risk yönetimi, özgüven, kişisel gelişim, zihinsel sağlık, zaman yönetimi, hedef belirleme, empati ve rakip analizi gibi temel iş becerilerini geliştirmek için kullanılabilecekleri güçlü bir araçtır. Her bir hamle, iş dünyasında başarı için büyük bir rol oynayabilir ve satranç oynamak, her açıdan gelişmemizi ve iş dünyasındaki performansımızı artırmamızı sağlar.
Başarılı bir iş kariyeri için, strateji tahtasındaki hamlelerinizin önemini asla küçümsemeyin.
Author: Ozan Çınarlı
Introduction
Retail serve as a financial solution who require funds for personal needs, differing from the financial aids provided to corporate companies. These loans are broadly categorized into two types: Cash Loans and Shopping Loans.
Cash Loans
Cash loans assist individuals in times of immediate financial need by depositing money directly into their bank accounts. This money can be utilized for various purposes immediately after issuance. However, it is essential to note that legal requirements in the banking sector can frequently change. For instance, the Banking Inspection Board (BDDK) recently mandated that all banks restrict customers from purchasing cryptocurrencies, stakes, and foreign currencies using cash loans. Subsequently, customers must now sign a commitment letter agreeing to these terms before obtaining a cash loan.
Interest Rates & Conditions
Interest rates on cash loans may vary depending on individual financial statuses and the accuracy and timeliness of their bill payments. Maintaining a high banking score, achieved by timely payments of credit installments, card debts, and utility bills, can facilitate better interest rates. Moreover, rates can differ based on the issuance channel; some banks’ mobile applications might offer more favorable rates compared to their call centers.
Shopping Loans
Shopping loans, on the other hand, are designated for purchasing products through online shopping platforms or physical stores, with the funds transferred directly to the store’s account by the bank. It’s crucial to note that these loans cannot be used as cash. Many modern online platforms and stores have integrated with bank credit systems, offering two primary integration methods:
With API integration, companies can design their screens by integrating web services provided by the bank, giving them the flexibility to choose the information or data displayed to the customer. However, this method does require companies to understand and implement credit business logic on their platforms, necessitating dedicated business analyst resources.
Web view integration enables companies to incorporate end-to-end solutions from banks. Upon choosing payment with credit, customers are directed to the bank’s integrated screens to complete the loan process within the web view. Once successfully completed, the bank notifies the company that the loan has been issued, allowing customers to proceed with their purchases.
Conclusion
Retail loans, whether in the form of cash or shopping loans, have evolved to cater to the varied needs of individuals, offering convenience and flexibility. However, it is imperative for individuals to understand the terms, conditions, and legal implications associated with them to make informed decisions.
Remember, the ever-evolving banking laws require customers and companies to stay informed about the latest amendments and adjustments in financial regulations to avoid unforeseen complications.
Author: Deniz Kurt
Agile çalışmanın esas amacı projeyi anlamlı en küçük parçalara bölerek sürekli ve kullanılabilir çıktılar üretmektir. Ancak günümüzde bazen bu yaklaşım, sürekli değişen taleplere uyum sağlama ihtiyacı olarak algılanabilir. Böyle bir durum, netleşmeyen isteklerin döngüsüne yol açabilir. Ayrıca, var olan isteklere ek olarak yeni isteklerin gelmesi de sıkça karşılaşılan bir durumdur.
İş Analistinin Rolü
Bir iş analistinin temel görevleri arasında projelerin takibini yapmak ve istekleri netleştirmek bulunmaktadır. Projeyi başarılı bir şekilde takip edebilmek için:
· Projenin detaylı planı, paydaşları ve efor çalışmaları hakkında bilgi edinmek gerekir.
· Eğer bu bilgiler daha önce oluşturulmuşsa, bu detayları talep etmek önemlidir.
· Proje başlangıcında gerçekleştirilen kick-off toplantısında proje planı üzerinden detaylı bir şekilde geçilmeli ve tüm proje paydaşları ile tanışılmalıdır.
Etkin İletişim ve Proje Takibi
Projede karşılaşılabilecek olası düzensizlikleri önlemek için:
· Takımın topluca iletişime geçebileceği kanallar üzerinden gruplar oluşturulmalıdır.
· Agile ritüellere uyulmalıdır.
· İşler proje planına göre önceliklendirilmeli ve her süreç eforlara göre takip edilmelidir.
· Yaşanan olumsuzluklar, plana etki ediyorsa zamanında gündeme getirilmeli, bu konudaki bilgiler paylaşılmalı ve çözüm yolları tüm ekiple paylaşılmalıdır.
Planlama ve Takip

Proje planının etkin bir şekilde yürütülmesi, hem geliştirme sürecinin sağlıklı ilerlemesini hem de çıktının kalitesini doğrudan etkiler. Bu nedenle:
· Proje planı her zaman güncel ve erişilebilir olmalıdır.
· Plan, süreçteki olumsuzluklar veya yeni gelen talepler doğrultusunda güncellenmeli, tüm ekiple paylaşılmalı ve müşteri/iş biriminin onayı alınmalıdır.
· Her yeni talep için gereken eforlar belirlenerek plana eklenmelidir.
Sonuç
Proje geliştirme, takım işidir. Bir takımda müşteri ve iş birimi de vardır ve bu takımın en güçlü dayanağı güvendir. Etkin, güncel ve şeffaf bir proje planı, bu güvenin temel taşlarından biridir. Etkin planlama, takım oyununun merkezine yerleştirilmelidir.
Author: Zehra Saygı
Projelerimizde bazı durumlarda uzun ya da içinde birden fazla yazı stili bulunan metinler eklememiz gerekebilir. Eğer eklenecek bu metin statik bir yapıdaysa tek tek biçimlendirmeler yapılarak istediğimiz görüntüde bir sayfayı oluşturabiliriz. Fakat bu metnin servisten bize gelmesi ya da tek tek biçimlendirmemizin pek mümkün olmadığı durumlarda başka çözümler kullanmamız gerekmekte.
kampanya detaylarını içeren bir ekranınız bulunuyor ve içindeki tüm bilgileri servisten alıyorsunuz. Bu ekranda kampanyanın kullanım koşullarında maddeler halinde uzunca bir yazı bulunuyor ve bazı maddelerin içinde bulunan linkler aracılığı ile bir sözleşme metnine yada websitesine kullanıcıyı yönlendirmeniz gerekiyor. Peki bunu nasıl yapabilirsiniz?
Markdown, John Gruber tarafından oluşturulan, basit ve okunabilir bir işaretleme dilidir (markup language). HTML bilgisi gerektirmeden metin biçimlendirmesine olanak tanır.
Çünkü sunduğu basit syntax ile herhangi bir editör kullanmadan dahi pratik bir şekilde metinlerinizi düzenleyip, bunları kullanıcılara hızlı bir biçimde gösterebilmenize olanak sağlıyor.
React Native projelerinizde Markdown kullanabilmek için projenize ekleyebileceğiniz birden fazla kütüphane bulunmakta. Fakat hem TypeScript desteği bulundurması hem detaylı bir dökümana sahip olması hem de aktif olarak yüksek bir kullanıma sahip olmasından dolayı, daha güncel kütüphaneler bulunsa da bu rehberde react-native-markdown-display kütüphanesini kullanacağız.
İlk olarak projemize kütüphaneyi eklemek ile başlayalım.
yarn add react-native-markdown-display
Kütüphane projeye eklendikten sonra kullanmak istediğiniz sayfaya import ederek hızlı bir biçimde kullanmaya başlayabilirsiniz.
Örnek:
import React from 'react';
import { SafeAreaView, ScrollView } from 'react-native';
import Markdown from 'react-native-markdown-display';

function App(): JSX.Element {
  const exampleMarkdown = `
 # Heading1 <h1>
 ## Heading 2 <h2>
 ### Heading 3 <h3>
 #### Heading 4 <h4>
 ##### Heading 5 <h5>
 ###### Heading 6 <h6>

   **Bold <strong>**
 *Italic <em>*
 ***Bold and Italic <em><strong>***

 >Block Quotes
 >>Nested Block Quotes

 1. Ordered List
   1. Ordered List
   2. Ordered List
 2. Ordered List
 2. Ordered List

 - Unordered List
     - Unordered List
    - Unordered List
 - Unordered List
 - Unordered List

 [Innovance](https://innovancetechnologies.de/) *Link with title*
 <https://innovancetechnologies.de/> *Direct Link*

 \`\`\`
   Code Area
 \`\`\`
  `;

  return (
    <SafeAreaView>
      <ScrollView contentInsetAdjustmentBehavior="automatic">
        <Markdown>{exampleMarkdown}</Markdown>
      </ScrollView>
    </SafeAreaView>
  );
}
export default App;
Projemize bu şekilde Markdown formatında metin eklemiş olduk. Bundan sonra tek yapmamız gereken bu metinleri tasarımımıza göre özelleştirmek. Peki bunu nasıl yapabiliriz? Kullandığımız kütüphane bunu yapmak için bize iki yöntem sunmakta.
Yöntem 1: style Propunu Kullanarak Özelleştirme: Markdown komponentinin style propunu kullanarak Markdown ögelerinin stillerini özelleştirebilirsiniz.
Örnek:
<Markdown
  style={{
    heading1: {color: 'red'},
    link: {textDecorationLine: 'none', color: 'blue'},
    ordered_list: {color: 'purple', fontSize: 24},
    em: {textDecorationLine: 'underline', fontStyle: 'normal'},
  }}>
    {exampleMarkdown}
</Markdown>
Yöntem 2: rules Propunu Kullanarak Özelleştirme: Markdown komponentinin rules propunu kullanarak kendi özel render kurallarımızı tanımlayarak Markdown öğelerinin görünümünü özelleştirebiliriz.
Örnek:
import React from  'react';
import  {
  ImageBackground,
  SafeAreaView,
  ScrollView,
  Text,
  View,
} from  'react-native';
import Markdown, {RenderRules} from 'react-native-markdown-display';

const Background = require('./assets/Color1.jpg');

const App = () =>  {
  const  exampleMarkdown:  any  =  `
    ### Heading 3 <h3>
    >Block Quotes
    Paragraph
  `;

const  renderRules:  RenderRules  = {
  heading3:  (node,  children)  =>  (
    <View  key={node.key}  style={{backgroundColor:  'purple'}}>
      <Text  style={{color:  'white',  fontStyle:  'italic',  fontWeight:  '900'}}>
        {children}
      </Text>
    </View>
  ),
  blockquote:  (node,  children,  _parent,  styles)  =>  (
    <View
      key={node.key}
      style={{
        ...styles._VIEW_SAFE_blockquote,
        borderColor:  '#5C9C5C',
        marginTop:  16,
        height:  162,
        width:  300,
    }}>
      <ImageBackground
        source={Background}
        resizeMode="contain"
        style={{width:  '100%',  height:  '100%'}}>
          <Text style={{color:  'white'}}>{children}</Text>
      </ImageBackground>
    </View>
  ),
  paragraph:  (node,  children)  =>  (
    <Text
      key={node.key}
      style={{
      textAlign:  node.type ===  'blockquote'  ?  'left'  :  'center',
      marginVertical:  16,
     }}>
       {children}
    </Text>
   ),
};

 return (
   <SafeAreaView>
     <ScrollView  contentInsetAdjustmentBehavior="automatic">
       <Markdown  rules={renderRules}>{exampleMarkdown}</Markdown>
     </ScrollView>
   </SafeAreaView>
  );
}
export  default App;
Bu şekilde projenize Markdown formatında metinler ekleyebilir, tasarımlarını özelleştirebilirsiniz.
Yararlı Linkler:
Author: Umutcan Gözegü
Öncelikle Agile projelerde metodoloji seçimi, proje kapsamı ve gereksinimleri, takım yapısı, iş akışı özellikleri gibi birçok faktörü göz önünde bulundurarak yapılması gereken bir iştir. Scrum ve Kanban, Agile projelerde en çok tercih edilen iki yaklaşım türüdür. Her iki yaklaşım da çevik ve esnek çalışma şekillerini vurgular, ancak farklı kurallar ve süreçler içerir. Hem Kanban hem de Scrum metodolojilerinde Scrum Master, ekibe rehberlik ederek süreçlerin etkili bir şekilde uygulanmasında ve geliştirilmesinde önemli bir rol üstlenir.
Belirli zaman aralıklarında tekrarlayan “Sprint” adı verilen dönemler boyunca çalışmayı vurgular. Bu dönemlerde, önceden belirlenmiş sürelerde hedeflenen iş miktarı tamamlanmaya çalışılır. Scrum’da, bir Product Owner ve bir Scrum Master rolü bulunur. İşler Backlog’dan seçilir ve Sprint boyunca çalışılır. Scrum, karmaşıklığı yönetmek ve tahmin edilebilir sonuçlar elde etmek amacıyla uygundur.
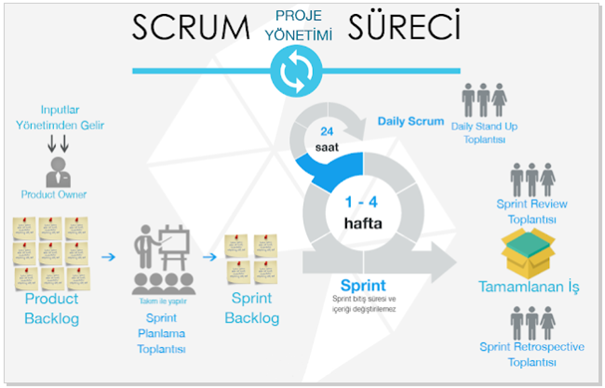
Scrum’ın Tercih Edilmesi Gereken Durumları:
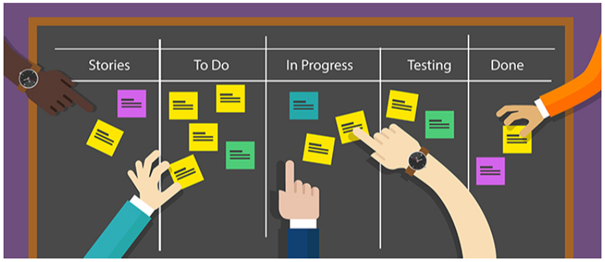
İş akışının görsel olarak izlendiği ve işlerin sınırlı WIP (Work in Progress) limitlerine tabi olduğu bir metodolojidir. Kanban, esnek bir yaklaşım sunar ve daha organik bir şekilde işlerin akmasını sağlar. Kanban tahtası, iş parçacıklarının farklı aşamalarda nasıl ilerlediğini gösterir. Kanban’ın ana amacı, iş akışını optimize etmek ve aşırı yüklemeyi önlemektir.
Kanban’ın Tercih Edilmesi Gereken Durumlar:
2. Roller:
3. İş Önceliklendirme:
4. Süreç İzleme:
5. WIP Limitleri:
6. Süreç Değişiklikleri:
Projeye uygun bir metodoloji seçmek, ekibin daha verimli çalışmasını ve projenin başarılı bir şekilde yönetilmesini sağlayabilir. Ancak uygun bir metodoloji seçilmediğinde yeni kurulan ekiplerde birliğin sağlanması ve iletişim kanallarının oluşturulması oldukça güç hale gelebilir. Bu tarz durumlarda başta üst yönetimin desteği doğrultusunda proje yöneticisine ve scrum master’a çok iş düşmektedir. Engellerin aşılması ve projenin sürekliliğinin sağlanması konusunda gerekli aksiyonların yetkili kişiler tarafından alınması gerekmektedir.
Yeni kurulan bir ekibin Scrum Master’ı olarak, özellikle başlangıç aşamasında bazı zorluklarla karşılaşmanız mümkündür. Bu zorluklarla başa çıkmak ve ekibinizi etkili bir şekilde yönlendirmek için kullanabileceğimiz bazı teknikler aşağıda detaylandırılmıştır:
Zorluk:
Çözüm:
Zorluk:
Çözüm:
Zorluk:
Çözüm:
Zorluk:
Çözüm:
Zorluk:
Çözüm:
Yeni kurulan bir ekibin Scrum Master’ı olarak, ekip üyelerinin ihtiyaçlarına odaklanarak, iletişimi güçlendirerek, süreçleri optimize ederek ve motivasyonu yüksek tutarak zorlukların üstesinden gelebilirsiniz. Bu durum, ekip üyeleri arasında bir güven ve iş birliği kültürü oluşturmanıza yardımcı olacaktır.
Özetle, Scrum Master’ın rolü, her iki metodolojinin se başarılı bir şekilde uygulanmasında kritik bir öneme sahiptir. Scrum Master, ekip üyelerini destekleyerek, süreçleri ve uygulamaları etkili bir şekilde yöneterek, iletişimi teşvik ederek ve sürekli öğrenme ve gelişmeye olanak sağlayarak Agile yaklaşımının temel prensiplerini hayata geçirir.
Her yeni başlangıç zorluklarla doludur, ancak doğru yaklaşımlar ve süreçlerle bu zorlukların üstesinden gelmek mümkündür. Başarılı Agile projeleri için, Scrum Master’ın öncülüğünde, tüm ekip üyeleriyle birlikte uyumlu ve verimli bir çalışma ortamı oluşturmak esastır.
Author: Betül Kaya
İlk olarak 2016 yılında İngiltere de başlayan Açık Bankacılık standartlaşma çalışmaları ve buna paralel Avrupa Birliğinde başlayan PSD1 ve ardından PSD2 çalışmalarıyla birlikte son yıllarda global dünyada Açık Bankacılık adını sıklıkla dünyaya duyurmaya başlamıştı.
Artan kullanıcı ihtiyaçları, bankaların ürün geliştirmedeki yavaşlıklarıyla birlikte açık bankacılık 2020’li yıllara geldiğimizde artık Türkiye’de de konuşulmaya başlamış ve T.C. Merkez Bankası 2020 sonlarına doğru yayınladığı Elektronik Bankacılık tebliğiyle Açık Bankacılığın sesleri Türkiye’de de artık duyulmaya başlamıştı. Ardından T.C. Merkez Bankasının BKM’i teknik sağlayıcı olarak belirlemesiyle birlikte ÖHVPS adında PSD2 standartlarına benzer Türkiye deki ilk Açık Bankacılık standardı oluşmaya başladı. İlk olarak taslak olarak başlayan çalışmalar, 2022’nin başında 1.0 versiyonu ile ilk resmi sürüm halinde yayınlanmış oldu.
2021 yılında standartları daha yeni yeni oluşmaya başladığında, bankalar ve fintech’ler nezninde kimse Açık Bankacılığın ne kadar uzun soluklu bir iş olacağını ve ülkenin buna ne kadar hazır olduğunu bilmiyordu. Innovance olarak bizde BKM’nin 1.0 versiyonunu yayınlamasının ardından, ÖHVPS standartlarına uygun, yeni teknolojiler kullanan, servis uyumluluğuyla müşterilerine hız ve direk entegre olunabilme rahatlığı sunan bir Açık Bankacılık ürünü yaratmak için çalışmalarımızı başlattık. Bu çalışmalarla birlikte YÖS rolünde çok kısa bir sürede BKM’nin teknik sertifikasyonunu geçen ilk firmalardan olmayı başardık. Aynı zamanda bu ürünü bir müşterimizin cüzdan uygulamasına da entegre ederek, gerçek anlamda ilk defa ürünün kullanımını sağladık. Hemen ardından ise HHS rolündeki çalışmalara başlayarak Açık Bankacılık ürününü alanında tüm standartları içinde barındıran bir ürün haline getirmeye devam ediyoruz.
Innovance Açık Bankacılık ürünü servisleri;
Ürün ile beraber müşterilerimize; Açık Bankacılık ara yüz ve/veya MW geliştirme desteği, BKM nezdinde Açık Bankacılık simülatör kurulum, test ve sertifikasyon sürecinin yönetilmesi ile Açık Bankacılık versiyon takibi ve danışmanlığı gibi tüm süreçlerde desteklerimiz bulunmaktadır.
Sizin de benzer bir ürün ihtiyacınız varsa, regülasyon dertlerinden kolayca kurtulmak istiyorsanız ve Açık Bankacılık yolculuğunda tecrübelerimizle size zaman ve kaynak kazanımı sağlamamızı istiyorsanız Innovance ile iletişime geçin, çözüm ortağınız olalım.
Author: Orhan Şen
Before using GitHub Copilot I have started AI pair development with ChatGPT. Even though I have three monitors, switching monitors was not fun because I am the kind of person who wants to fully focus the screen when the IDE is opened. Then I started to look for Android Studio plugins that can improve my productivity to embed ChatGPT or other AI products.
Then I encountered Github Copilot and found it was worth a try. They offer a 30-day trial. Also if you are suitable for one of the following criteria you can use it free.
GitHub Copilot is free to use for verified students, teachers, and maintainers of popular open source projects. If you are not a student, teacher, or maintainer of a popular open source project, you can try GitHub Copilot for free with a one-time 30-day trial.
Anyways here are what I learnt to use Github Copilot better
How to Install Github Copilot
To use GitHub Copilot in AndroidStudio you must install Copilot extension.
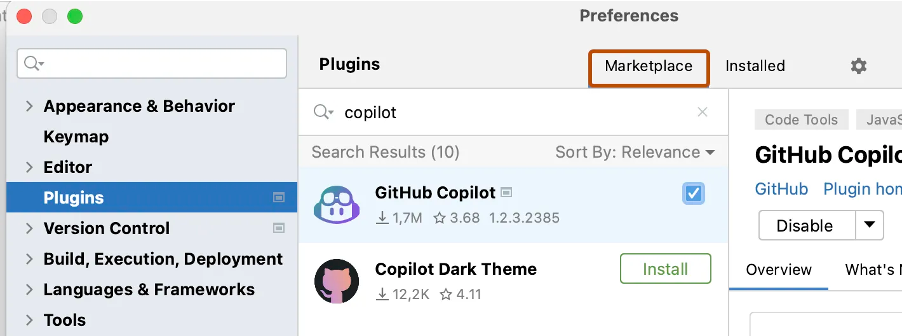
Click the settings from menu then find the Plugins section. Click Marketplace. In the search bar, search for GitHub Copilot, then click Install.
After GitHub Copilot is installed restart AndroidStudio.
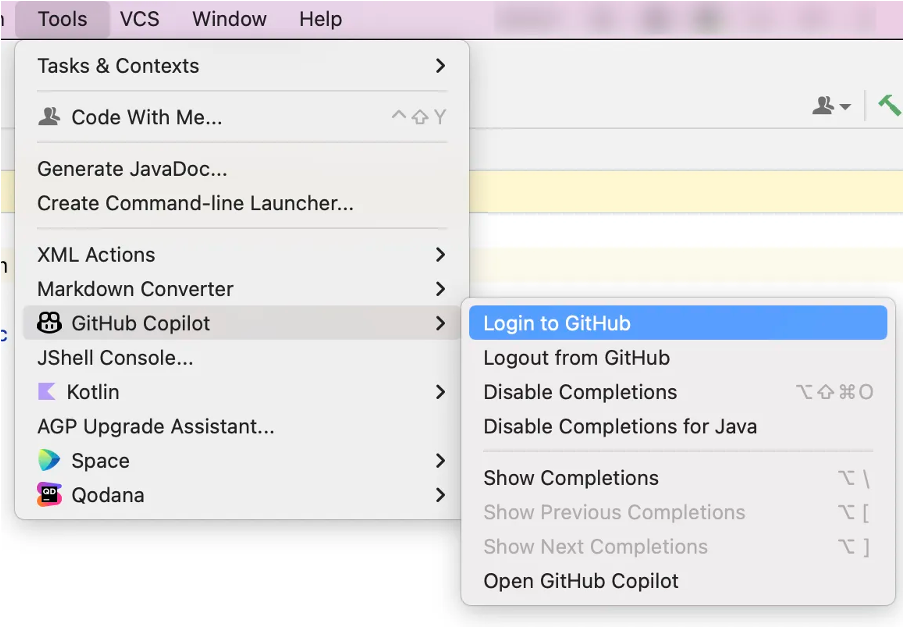
After your AndroidStudio has restarted, click the Tools menu. Click GitHub Copilot, then click Login to GitHub.
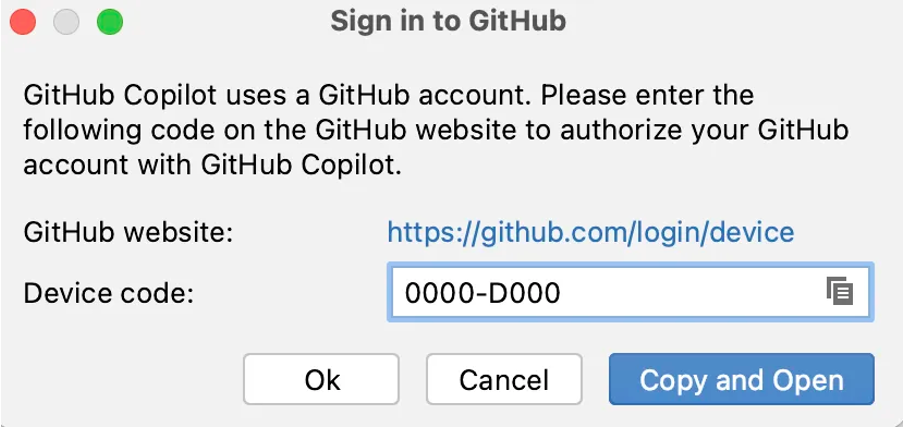
In the “Sign in to GitHub” dialog box, and copy device activation code and open browser with this action. Then paste activation code to activation window in browser. GitHub will request the necessary permissions for GitHub Copilot. To approve these permissions, click Authorize GitHub Copilot Plugin.
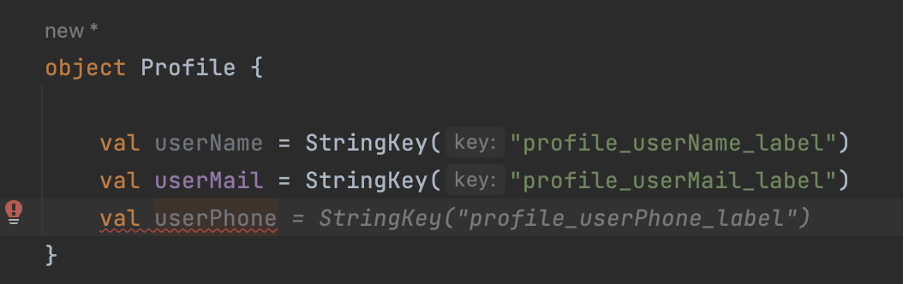
Using patterns in your codes helps AI to predict more accurately and this also makes your code cleaner. As the following example, instance name and string have patterns to make code more predictable. Otherwise, AI would suggest random meaningful string resources which may not expected.
Let’s say we want to check app update status and AI recommend a function that is just nothing but returns false.
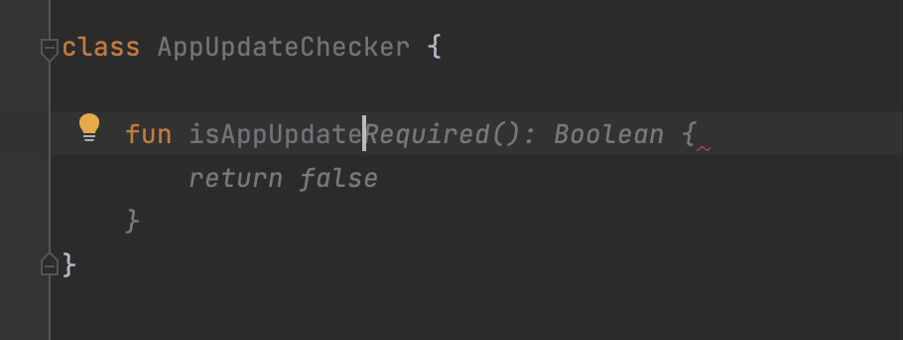
In these kinds of functions, we should refer to use cases as comments. Also, it will help other developers understand how the function works.
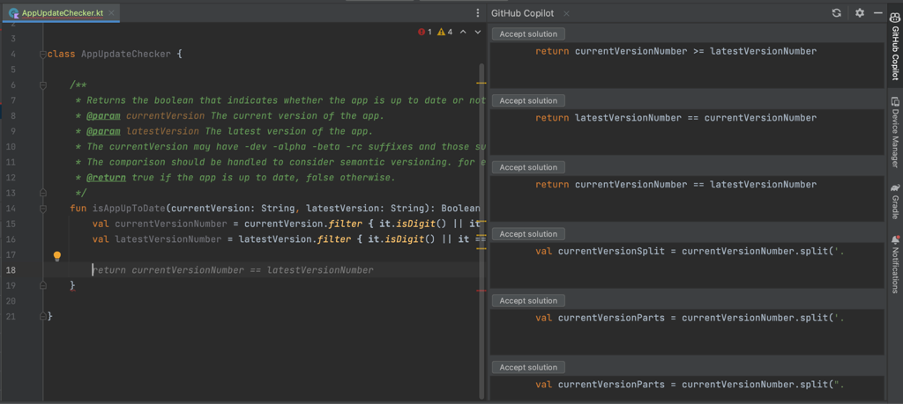
Copilot will encourage the simplest solution as much as possible but the simplest does not mean a working solution so we can help it to select which way it should continue. After guiding it will complete a function as expected but you should all time review the code is written by AI because it may finish similar to right solution, but it might not be
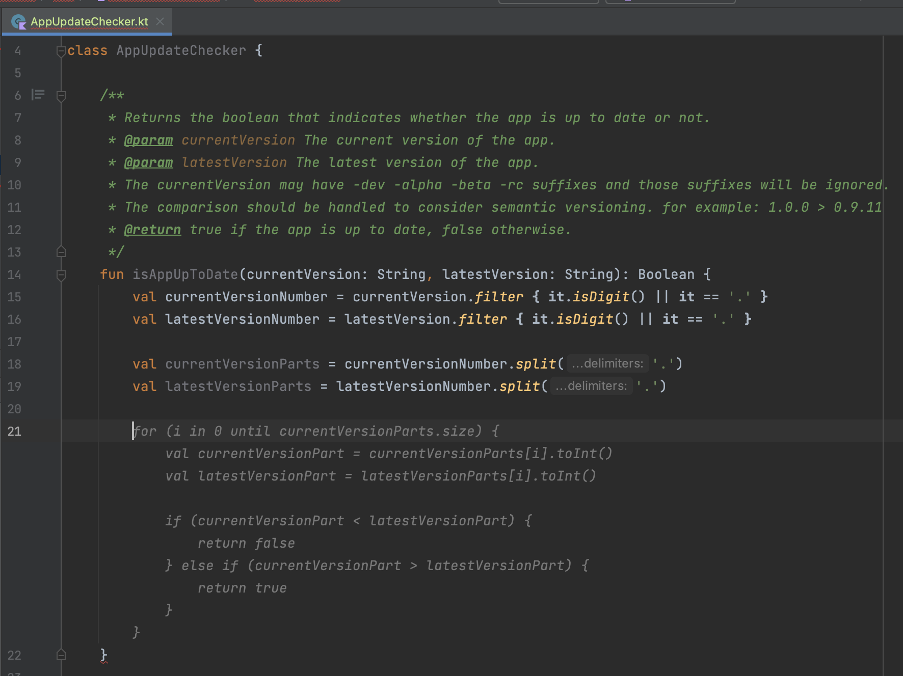
We can take this part as prompt engineering.
Copilot helps us to find the most popular code completion from the git repos, but it does not mean the right or best solution. For example, the following example copilot suggested that I create html-supported text with android.text.Html.FROM_HTML_MODE_LEGACY flag.

I do not go into details about my project but the android project that supports Android API 24 or higher so using android.text.Html.FROM_HTML_MODE_COMPACT is going to make more sense. That shows Copilot may not suggest you project target build or something similar dependencies. Reviewing process is still vital.
I started a project with CoPilot and it is open. It seems creating your code and resources suggestible and sustainable patterns help CoPilot’s understanding and suggesting algorithm. Also, it helps a developer too. I like this kind of encouragement.
Sometimes it makes vital suggestions but if you review the code that is not a big deal you can easily get the next suggestion, you can give a good prompt over comment or you can make a starting point of function to help it.
I handed my workload about %30 percent. When I see the plugin is not opened and not making suggestions due to the IDE plugin bug issue, I do not continue before reopening IDE that shows it helps me.
Author: Gökberk Yağcı
Thanks to our experience in banking services infrastructure and solid resources, Innovance successfully carried out the project with the client’s teams. Innovance formed a team by combining its experience in banking infrastructure with its strong technology team as members of the bank’s own team. With this powerful team, Innovance provided training for the software development teams of the bank, resulting in a major impact that exceeded expectations in a very short period of time.
Innovance has migrated the related systems including Tibco technology with closed-source code used as the middle layer (MW) and service infrastructure within the bank, to an open-source Java architecture tailored to the bank’s standards. Initially, Innovance transformed all related channels of the bank (Branch, Internet Banking, Mobile Banking, Call Center, IVR, etc.) to the new banking service infrastructure using this middle layer, enabling the development of new services on the updated architecture. As a result, the combined teams responsible for various modules such as retail credits, corporate credits, open banking, and internal corporate applications were initiated to use this new structure. In this new dynamic system, the bank currently continues to transform the services in their own modules in an ongoing Project.
One of the main goals during this transformation was to ensure that the existing screens were not affected by the infrastructure changes by not altering the inputs nor outputs of all related services. We successfully accomplished this objective within approximately one year.
In the second phase of the project, Innovance identified high-volume services in the old infrastructure consuming 80% of the CPU (with an average call duration of 150 seconds) and enabled the closed-source system to eliminate a significant portion of licenses and server costs. Innovance migrated approximately 5,000 (around 55% of the remaining services) to the new architecture by making performance improvements. To facilitate this migration and make it compatible with the new system, and standardizing it, Innovance developed a “code generator” over a period of 1.5 years, and subsequently completed the migration process. The second phase of this major transformation took approximately 3 years to complete.
Why was this transformation required?
If your bank is also in need of a similar success story, please contact us via www.innovancetechnologies.de/contact and let us be your solution partner.
In the last decade, the popularity of remote work has been increasing rapidly among employers and employees. After the pandemic in 2020, especially in the information technology sector, remote work become more and more popular. Most employers started to offer the option to work from home entirely or hybrid. People can work almost anywhere these days, at home, in coffee shops, or in any location with a stable internet connection. These advancements and capabilities caused a big change in traditional work arrangements. While remote work has many benefits and opportunities for both employees and employers these days, it also comes with some disadvantages.
Flexibility is one of the most significant advantages of remote work. Any location with a stable internet connection can be used as an office for employees. Also, people can choose to work in the period in which they are most productive, early in the morning, late at night, slightly noisy, totally quiet etc. With this opportunity, employees feel more comfortable and can be more productive. It also creates the chance to adjust their work with other activities such as housework, children care, outside office business etc. Instead of taking time from work while in the office, an employee can adjust his/her daily work according to these activities and not fall behind the work schedule.
Many studies and surveys, remote workers’ productivity is higher than office-based workers. Many factors play roles in this outcome. Workers have more autonomy in their work, more focused on tasks away from distractions in the office such as chats, meetings, office issues etc. Without these distractions, remote workers can concentrate on their work, which results in higher productivity.
Cost saving is another significant advantage for both employees and employers. Transportation costs and time for employees are high to go to an office. The main cost for employees is time on this issue. This time on the way can be used more productively. From the employers’ point of view, this is cost-saving in literal terms. Office costs, utilities, and other expenses regarding maintaining an office can be avoided. In addition to this, since a person can work from anywhere, the pool of potential employees is getting bigger for companies. A person even from another company can easily be employed.
However, the fact that there are many advantages of remote work does not change the reality of some disadvantages it brings to the table. For example, technology lies at the core of remote work for almost every industry. It may be harder to communicate and get the necessary information for a colleague than face to face. Miscommunication, delays, and problems within teams can be caused by this. Also, people can get isolated from colleagues, companies, and even society for that matter. This may result in a lack of motivation, decrease job satisfaction, and getting away from company culture and principles.
Of course, these problems may be averted with gatherings, social occasions, and different activities from time to time. This can help workers to stay connected, maintain relationships and have more motivation toward their job and company.
To conclude, advantages and disadvantages are possible to occur for remote work as on many topics, it depends on both employees and employers to create these outcomes. Remote work became a very important indicator for employees to accept a job, but bad execution of remote work can end up in worse ways than expected. The success of remote work depends on effective communication, a good work environment, and a clear understanding of the expectations and responsibilities of one another. Maintaining a good balance will result in a good outcome for both sides.
Author: Tayyip Adal
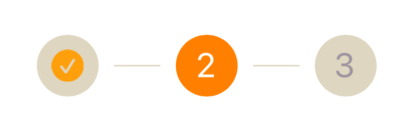
User experience and ergonomics are now almost the most important metrics in today’s web and mobile applications. In this direction, stepper is one of the leading screen design trends, especially in progressive transactions such as payment, registration process or identity verification. Stepper is an indispensable design component, which provides information about which step the user is on and how the road map will be in front of them, and when it is presented with a design that is pleasing to the eye, it greatly enhances the user experience.


In this article, I am going to explain how we can create the design of a multifunctional stepper component in the iOS ecosystem with the Swift language and how we can easily implement it in the design of application screens. Let’s get started, pleasant reading 🙂
While starting the working logic of the component, let’s first look at the variables and objects we use in the component. Since there are different usage scenarios, there is an enum structure where we choose the stepper type. This enum consists of two cases, .Numeric and .Icon. We can create a numeric stepper or a stepper consisting of icons. We will be setting this when we implement it on the screens. If the stepper will be implemented with the .Icon selection, it is fed by a dictionary called stepperIcons. This dictionary contains the names of the icons used in the steps of the stepper. These names can be the names of the icons in the Assets folder or the names of the system icons.
import UIKit

@IBDesignable
final class StepperView: UIView {

    enum StepperType {
        case Numeric
        case Icon
    }
    /// The stepper type selection
    var stepperType: StepperType = .Numeric
    var stepperIcons = [Int:String]()
numberOfPoints, currentIndex and completedTillIndex are the variables that hold information about how many steps the stepper will have, the current step and the completed steps up to the current step. We will use these variables when drawing the steps.
The lineHeight and radius variables are the most important variables that allow us to draw. The lineHeight variable holds the thickness of the line between two steps and the radius variable holds the radius of each circular step. Both of these variables have computed properties called _lineHeight and _radius, and the actual calculation of the variables takes place in these computed properties.
/// The number of displayed points in the component
    @IBInspectable var numberOfPoints: Int = 3 {
        didSet {
            setNeedsDisplay()
        }
    }

    /// The current selected index
    @IBInspectable var currentIndex: Int = 1 {
        didSet {
            setNeedsDisplay()
        }
    }

    @objc var completedTillIndex: Int = -1 {
        didSet {
            setNeedsDisplay()
        }
    }

    @objc private var currentSelectedCenterColor = UIColor(red: 101.0/255.0, green: 66.0/255.0, blue: 190.0/255.0, alpha: 1.0)
    @objc private var centerLayerTextColor = UIColor(red: 156.0/255.0, green: 145.0/255.0, blue: 158.0/255.0, alpha: 1.0)


    private var lineHeight: CGFloat = 1.0 {
        didSet {
            setNeedsDisplay()
        }
    }

    @objc private var textDistance: CGFloat = 20.0 {
        didSet {
            setNeedsDisplay()
        }
    }

    private var _lineHeight: CGFloat {
        get {
            if lineHeight == .zero || lineHeight > bounds.height {
                return bounds.height * 0.4
            }
            return lineHeight
        }
    }

    /// The point's radius
    private var radius: CGFloat = 40.0 {
        didSet {
            setNeedsDisplay()
        }
    }

    private var _radius: CGFloat {
        get {
            if radius == .zero || radius > bounds.height / 2.0 {
                return bounds.height / 2.0
            }
            return radius
        }
    }
While drawing the stepper, I used CALayer and CATextLayer structures using Core Animation. In fact, the designs seen by the user on the screen consist of layers. With the different objects we place on these layers, we reveal the entire design.
We keep the layers required for the component we will design in a private variable. Then, when our component is init with a commonInit function, we add these layers to the main layer as sublayers. I created a few different layers here as an example. I don’t use all of these layers in the component.
// MARK: - Private properties

    private var backgroundLayer = CALayer()

    private var progressLayer = CAShapeLayer()

    private var selectionLayer = CAShapeLayer()

    private var clearSelectionLayer = CAShapeLayer()

    private var clearLastStateLayer = CAShapeLayer()

    private var lastStateLayer = CAShapeLayer()

    private var lastStateCenterLayer = CAShapeLayer()

    private var selectionCenterLayer = CAShapeLayer()

    private var roadToSelectionLayer = CAShapeLayer()

    private var clearCentersLayer = CAShapeLayer()

    private var maskLayer = CAShapeLayer()

    private var centerPoints = [CGPoint]()

    private var _textLayers = [Int: CATextLayer]()

    private var _customImageLayers = [Int: CALayer]()

    private var _imageLayers = [Int: CALayer]()

    private var previousIndex: Int = 0

    // MARK: - Life cycle
    override init(frame: CGRect = .zero) {
        super.init(frame: frame)
        commonInit()
    }

    required init?(coder aDecoder: NSCoder) {
        super.init(coder: aDecoder)
        commonInit()
    }

    func commonInit() {
        layer.addSublayer(clearCentersLayer)
        layer.addSublayer(backgroundLayer)
        layer.addSublayer(progressLayer)
        layer.addSublayer(clearSelectionLayer)
        layer.addSublayer(selectionCenterLayer)
        layer.addSublayer(selectionLayer)
        layer.addSublayer(roadToSelectionLayer)
        progressLayer.mask = maskLayer

        contentMode = UIView.ContentMode.redraw
    }
override func draw(_ rect: CGRect) {
        super.draw(rect)

        completedTillIndex = currentIndex

        centerPoints.removeAll()

        let distanceBetweenCircles = (bounds.width - (CGFloat(numberOfPoints) * 2 * _radius)) / CGFloat(numberOfPoints - 1)

        var xCursor: CGFloat = _radius


        for _ in 0...(numberOfPoints - 1) {
            centerPoints.append(CGPoint(x: xCursor, y: bounds.height / 2))
            xCursor += 2 * _radius + distanceBetweenCircles
        }

        let bgPath = _shapePath(centerPoints, aRadius: _radius, aLineHeight: _lineHeight)
        backgroundLayer = bgPath

        switch stepperType {
        case .Numeric:
            renderTextIndexes()
        case .Icon:
            renderCustomImageIndexes()
        }
        renderImageIndexes()
    }
We can actually think of this as the setup function where we collect everything and put it together to draw it on the screen. We fill the StepperView with the draw function we override from UIView.
We determine the current state of the stepper by mapping completedTillIndex to currentIndex.
The centerPoints[] array is a CGPoints array that holds the exact position of the steps.
To calculate the distance between each point, we subtract the total diameter of the steps from the total width of the stepper and divide by the number of steps. In this way, we can calculate the equal distance between each stepper.
Then, in a for loop, we calculate the exact position where each step will be drawn using the radius and the variable that holds the distance between the steps and append it to the centerPoints array. You can think of xCursor as the cursor pointing to the point here. At the end of each loop, we update the position of xCursor to iterate.
Then we assign the layer that we drew in the _shapeLayer function to the backgroundLayer we created. We add the backgroundLayer as a sublayer in commonInit.
The drawing of the layers and the calculation of the points is complete. All that remains is to determine the content of each step. By doing this in the renderTextIndexes(), renderImageIndexes() and renderCustomImageIndexes() functions that we call according to the stepperType, the lifecycle of the component is completed.
Apart from layer drawings, another main topic is the creation of step indexes in the layer. In this example, I created the component over three layers. If the stepper will be used as .numeric, the renderTextIndexes() and renderImageIndexes() functions are enough for stepper drawing. If the stepper is in .icon format, we use the renderImageIndexes() and renderCustomIndexes() functions.
private func renderTextIndexes() {
        if (stepperType == .Numeric) {
            for index in 0...(numberOfPoints - 1) {
                let centerPoint = centerPoints[index]

                let textLayer = _textLayer(atIndex: index)

                textLayer.contentsScale = UIScreen.main.scale
                textLayer.font = centerLayerTextFont
                textLayer.fontSize = (centerLayerTextFont?.pointSize)!

                if index == currentIndex || index == completedTillIndex {
                    textLayer.foregroundColor = UIColor.white.cgColor
                } else {
                    textLayer.foregroundColor = centerLayerTextColor.cgColor
                }

                if index < currentIndex {
                    textLayer.string = ""
                } else {
                    textLayer.string = "\(index + 1)"
                }

                textLayer.frame = .init(origin: CGPoint(x: 0.0, y: 0.0), size: textLayer.preferredFrameSize())
                textLayer.frame = CGRect(x: centerPoint.x - textLayer.bounds.width / 2,
                                         y: centerPoint.y - (textLayer.fontSize) / 2 - (textLayer.bounds.height - textLayer.fontSize) / 2,
                                         width: textLayer.bounds.width,
                                         height: textLayer.bounds.height)

            }
        }
    }
    private func renderImageIndexes() {
        for index in 0...(numberOfPoints - 1) {
            let centerPoint = centerPoints[index]

            let imageLayer = _imageLayer(atIndex: index)

            imageLayer.contentsScale = UIScreen.main.scale

            if (index < currentIndex) {
                imageLayer.isHidden = false
            } else {
                imageLayer.isHidden = true
            }

            imageLayer.frame.size = CGSize(width: 21, height: 21)

            imageLayer.frame = CGRect(x: centerPoint.x - imageLayer.bounds.width / 2,
                                      y: centerPoint.y - imageLayer.bounds.height / 2,
                                      width: imageLayer.bounds.width,
                                      height: imageLayer.bounds.height)
        }
    }
private func renderCustomImageIndexes() {
        for index in 0...(numberOfPoints - 1) {
            let centerPoint = centerPoints[index]

            let customImageLayer = _customImageLayer(atIndex: index)

            customImageLayer.contentsScale = UIScreen.main.scale

            if !(index < currentIndex) {
                customImageLayer.isHidden = false
            } else {
                customImageLayer.isHidden = true
            }

            if (index == numberOfPoints - 1) {
                customImageLayer.frame.size = CGSize(width: 18, height: 20.24)
            } else {
                customImageLayer.frame.size = CGSize(width: 21, height: 21)
            }

            customImageLayer.frame = CGRect(x: centerPoint.x - customImageLayer.bounds.width / 2,
                                            y: centerPoint.y - customImageLayer.bounds.height / 2,
                                            width: customImageLayer.bounds.width,
                                            height: customImageLayer.bounds.height)
        }
    }
Each of these functions determines the content of a layer. The center points for drawing are taken from the centerPoints array. There are _textLayer, _imageLayer and _customImageLayer functions used in each function, which create the layers. The layers created using these functions are shown or hidden according to the currentIndex.
The _textLayer() function creates the layer with the numbers in the .numeric stepper. The _imageLayer() function creates the layer with the done icon in the completed steps. Finally, the _customImageLayer() function creates the layer with the icons in each step if the stepper is in the .Icon view. If the index in the for loop is greater than or equal to the currentIndex, the imageLayer is hidden and vice versa.
At the end of the each render functions, the frame of the layer is rendered according to the coordinates in the centerPoints.
private func _textLayer(atIndex index: Int) -> CATextLayer {

        var textLayer: CATextLayer
        if let _textLayer = _textLayers[index] {
            textLayer = _textLayer
        } else {
            textLayer = CATextLayer()
            _textLayers[index] = textLayer
        }
        layer.addSublayer(textLayer)
        return textLayer
    }
    private func _imageLayer(atIndex index: Int) -> CALayer {

        var imageLayer: CALayer
        if let _imageLayer = _imageLayers[index] {
            imageLayer = _imageLayer
        } else {
            imageLayer = CALayer()
            //            imageLayer.contents = UIImage(systemName: "star.fill")?.cgImage
            imageLayer.contents = UIImage(named: "doneStep")?.cgImage
            _imageLayers[index] = imageLayer
        }
        layer.addSublayer(imageLayer)

        return imageLayer
    }
private func _customImageLayer(atIndex index: Int) -> CALayer {
        var customImagelayer: CALayer
        let uncheckedIconColor = UIColor(red: 156.0/255.0, green: 145.0/255.0, blue: 158.0/255.0, alpha: 1.0)
        let checkedIconColor = UIColor.orange
            if let _customImageLayer = _customImageLayers[index] {
                customImagelayer = _customImageLayer
            } else {
                customImagelayer = CALayer()
                var stepIcon = UIImage(named: stepperIcons[index] ?? "")
                if index <= currentIndex {
                    customImagelayer.contents = stepIcon?.withColor(checkedIconColor)
                } else {
                    customImagelayer.contents = stepIcon?.withColor(uncheckedIconColor)
                }
                _customImageLayers[index] = customImagelayer
            }
        layer.addSublayer(customImagelayer)

        return customImagelayer
    }
We mentioned that the _draw() function is where we put all the pieces together. The most important of these parts is the _shapePath() function. In this function, we are drawing all the calculations we made using UIBezierPath().
private func _shapePath(_ centerPoints: [CGPoint], aRadius: CGFloat, aLineHeight: CGFloat) -> CALayer {

        let nbPoint = centerPoints.count

        for i in 0..<nbPoint{
            let centerPoint = centerPoints[i]
            let shape: UIBezierPath
            let fillLayer = CAShapeLayer()
            shape = UIBezierPath(roundedRect: CGRect(x: centerPoint.x - aRadius, y: centerPoint.y - aRadius, width: 2.0 * aRadius, height: 2.0 * aRadius), cornerRadius: aRadius)

            /// Background color set of step points.
            switch stepperType {
            case .Icon:
                if i <= currentIndex {
                    fillLayer.path = shape.cgPath
                    fillLayer.fillColor = UIColor(red: 214.0/255.0, green: 204.0/255.0, blue: 178.0/255.0, alpha: 0.8).cgColor

                }else{
                    fillLayer.path = shape.cgPath
                    fillLayer.fillColor = UIColor(red: 231.0/255.0, green: 229.0/255.0, blue: 232.0/255.0, alpha: 1.0).cgColor
                }
            case .Numeric:
                if i <= currentIndex{
                    if i != currentIndex {
                        fillLayer.path = shape.cgPath
                        fillLayer.fillColor = backgroundShapeColor.cgColor
                    } else {
                        fillLayer.path = shape.cgPath
                        fillLayer.fillColor = UIColor.orange.cgColor
                    }
                }else{
                    fillLayer.path = shape.cgPath
                    fillLayer.fillColor = backgroundShapeColor.cgColor
                }
            }
            layer.addSublayer(fillLayer)

            let shapeLayer = CAShapeLayer()
            if nbPoint > 1 && i != nbPoint - 1{
                //design the path
                let path = UIBezierPath()
                let nextPoint = centerPoints[i + 1]
                path.move(to: CGPoint(x: centerPoint.x + aRadius + 10, y: centerPoint.y))
                path.addLine(to: CGPoint(x: nextPoint.x - aRadius - 10, y: nextPoint.y))

                //design path in layer
                shapeLayer.path = path.cgPath
                shapeLayer.strokeColor = backgroundShapeColor.cgColor
                shapeLayer.lineWidth = aLineHeight
            }
            layer.addSublayer(shapeLayer)
        }
        return layer
    }
The function takes as parameters the centerPoints array containing the points to be drawn, the lineHeight variable containing the height of the line to be drawn between two steps and the radius variable containing the step radius. In a for loop, a drawing is made with UIBezierPath for each step. Then the inside of the drawing is colored according to the stepper type.
In the last part, the drawing is completed by drawing the line between the two steps in the shapeLayer. Then the layer containing all of them is returned to be used in the draw() function.
After creating your interface with storyboard or programmatic, create a UIView. This view should be an object from the StepperView class. You should update the width constraint according to the number of steps you want to apply. For a stepper with 3 steps, the ideal width can be taken as 220 points.

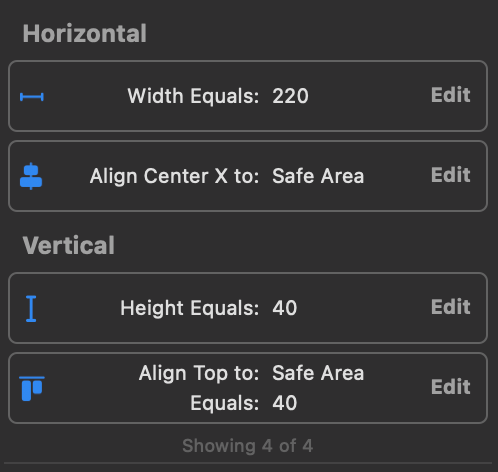
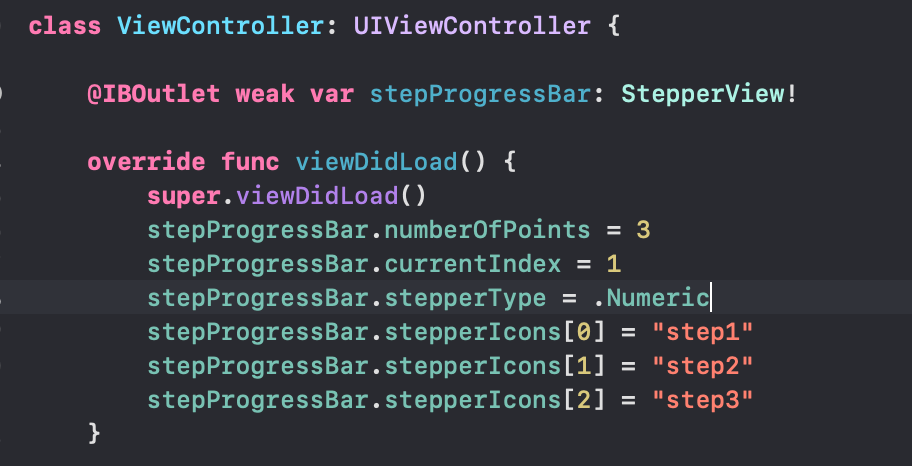
After defining the stepper in ViewController, you can give numberOfPoints and currentIndex values as you want. You can select the stepper type. If you want to use the stepper in .icon view, you can give the icon names as a string to the stepperIcons dictionary.
You can customize the stepper according to your wishes. The key points for this will be the renderTextImages, renderImageIndexes and renderCustomImageIndexes functions. The icons on the stepper can be updated on these functions.
Again, since the _shapePath function is where the drawings are made, you can focus on this function for color changes and updates.
In this article, I tried to explain how we can build a stepper component with Swift using UIBezierPath and Core Animation layers. I hope it was a useful and understandable article. You can access the demo project from my GitHub account below. See you in the next article! 👋🏻
Author: Oğuzhan Kertmen